
Animations involving just camera motion through a static scene or around a static object are adequate for many different applications. Using only camera motion, the viewer can see what it would be like to walk through a building which exists only as a computer model. The view from the driver's seat of a new vehicle design can be created. Even a simulation of an object flying past the viewer can be created (by flying the viewer past the object instead).
For a variety of applications, the true value of animation is realized only when the geometric objects themselves have motion. Perhaps a vehicle drives past a familiar stationary landmark and the eye follows the vehicle away after it enters the scene. As the vehicle drives over a bump in the road the suspension system is seen to flex and energy is transferred to the frame. Things which cannot ordinarily be seen can be made more visible by watching them change over time. As our vehicle crosses a bridge, its weight causes it to flex and vibrate even after the vehicle is gone. These effects could be made visible by amplifying them until they are readily observable.
The animation of objects is accomplished by specifying matrix transformations to be applied to database elements before each image is calculated. This allows any solid or combination in the model to have its definition independently rotated, moved, or resized as the animation proceeds.
In BRL-CAD matrices are stored in a traditional mathematics form. This is different from (the transpose of) the form used in most texts on computer graphics. In BRL-CAD matrices are stored as follows:
As a result, points and vectors in 3 dimensional space are represented as 4-tuple column vectors. Points and vectors are therefore properly transformed by the matrix equation:
Individuals who are unfamiliar with matrix transformations in general and homogeneous coordinate systems in specific are urged to study one of the many texts on this subject.
The matrix operations in a BRL-CAD database can be thought of as living in the arcs of the directed acyclic graph. In slightly simpler terms, the matrix lives between an object (either primitive solid or combination record) and the parent combination record in the model tree. The model coordinate system is on the ``left'' end of a ``stack'' of matrix multiplications which is built up as the graph is traversed. When traversing the graph from the root to the leaves, matrices encountered on the arcs are applied to the ``right'' of the matrix equation. For example, the graph formed by ``all.g'' from our geometry file ``moss.g'' can be thought of as the following table:
Purists will note that MatrixA is not directly stored in the database. It exists as a conceptual aid to editing models and creating animations. In reality MatrixA will be combined with each of the matrices MatrixPr, MatrixBr, MatrixEr, MatrixCr, MatrixTr, MatrixLr from the table above.
The program rt would transform the origin (and other parameters) of ``tor'' with the following matrix equation:
Each of the matrices in the database can be altered individually during the animation. It is also possible to replace the ``stack'' matrix which has been accumulated. These operations are achieved with the ``anim'' command in the input script to rt. The command has the form:
anim Path matrix Operation [Matrix];where Path specifies the arc where the operation takes place. Either a specific use of the matrix within the model, or all uses of an arc within the model can be specified.
The Operation portion of the anim command specifies the matrix operation to be performed. The set of valid operations is listed below.
For example, the following command always replaces the matrix on the arc between ``arm'' and ``hand'' with a new matrix:
	anim arm/hand matrix rarc
		1    0    0    0
		0    1    0    0
		0    0    1    0
		0    0    0    1;
Whereas in the next example the matrix will be replaced only when ``arm/hand'' occurs as a direct child of ``body/left'' in the database tree. This would permit the left and right hands to be modeled as different instances of a single hand prototype, and still allow the left hand to be manipulated without affecting the right hand.
	anim body/left/arm/hand matrix rarc
		1    0    0    0
		0    1    0    0
		0    0    1    0
		0    0    0    1;
Finally, a command of the form:
	anim hand matrix rarc
		1    0    0    0
		0    1    0    0
		0    0    1    0
		0    0    0    1;
operates on any arc which ends in a node called ``hand'' regardless of where it occurs in the model hierarchy. Note that element ``hand'' in these examples above is not a leaf node (primitive solid) in the model graph (With version 4.2 of BRL-CAD and beyond the user will be able to manipulate the matrices on the arcs between primitive solids and their parent combinations).
All object parameters in the database are stored using millimeters as the unit of measure. As a result, all matrix operations are carried out in units of millimeters. It is important to remember this when preparing matrices for use with the rt anim command. An example rt session will serve to illustrate the proper use of the anim command.
The following shell script ``trans.sh'' runs rt to create two separate images. The first is saved in the file ``trans.pix.1'' and is approximately the view selected for the key-frame ``moss_8'' in Section 2. The ``pix-fb'' utility can be used to display these images on the framebuffer.
#!/bin/sh
rt -M $* -o trans.pix moss.g 'all.g' 2>> trans.log << EOF
viewsize 200;
eye_pt 20.0 0.0 100;
orientation 0.0 0.0 0.924 0.383;
start 1;
clean;
end;

start 2;
clean;
anim all.g/tor.r matrix rarc
        1 0 0  0
        0 1 0 80
        0 0 1  0
        0 0 0  1;
end
EOF

The second image
is saved in ``trans.pix.2'' and is the same except that the matrix on the arc
between ``all.g'' and ``tor.r'' is replaced with a new matrix.
This matrix has the effect of translating the torus 80 millimeters
along the Y axis of the model coordinate system.
It is time to re-visit the animation sequence we developed in Section 2. We are going to add animation of the objects in the scene to the existing eye-point movement already created. The ellipsoid will be given a constant velocity along a vector which will take it through the center of the torus.
To make the ellipsoid pass through the center of the torus we must determine the vector from the center vertex of ``ellipse.s'' to the center vertex of ``tor''
% mged moss.g
BRL-CAD Release 4.1   Graphics Editor (MGED)
    Tue Oct 20 14:19:59 EDT 1992, Compilation 5
    stay@vail:/n/wolf/m/dist4.1/mged

attach (nu|tek|tek4109|ps|plot|sgi|X)[nu]? sgi
ATTACHING sgi (SGI 4d)
Gary Moss's "World on a Platter" (units=mm)
mged> l all.g
all.g:  all.g (len 6) --
  u platform.r
  u box.r [-23.6989,13.41,8.02399]
  u cone.r [22.0492,12.2349,2.11125e-07]
  u ellipse.r [14.6793,-41.6077,38.7988]
  u tor.r
  u light.r
mged> l ellipse.s
ellipse.s:  ellipsoid (ELL)
        V (16.1309, 46.6556, -3.72252)
        A (14.8761, 0, 0) mag=14.8761
        B (0, 8.98026, -8.98026) mag=12.7
        C (0, 8.98026, 8.98026) mag=12.7
        A direction cosines=(0.0, 90, 90)
        A rotation angle=0, fallback angle=0
        B direction cosines=(90.0, 45, 135)
        B rotation angle=90, fallback angle=-45
        C direction cosines=(90.0, 45, 45)
        C rotation angle=90, fallback angle=45

mged> l tor
tor:  torus (TOR)
        V (4.91624, -32.8022, 31.7118), r1=25.4 (A), r2=5.08 (H)
        N=(0, 1, 0)
        A=(0, 0, 1)
        B=(1, 0, 0)
        vector to inner edge = (0, 0, 20.32)
        vector to outer edge = (0, 0, 30.48)
mged> q
Doing a little vector math we find the vertex of
the ``ellipse.s'' as it is found in ``all.g'' is at:
Now we subtract this from the origin of ``tor'' to get a vector that will translate ``ellipse.s'' to the center of the torus. This vector is scaled by a factor to 2 to get a ``net displacement'' vector for the ellipsoid.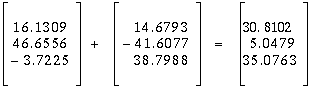
We can now create a new interpolation table with motion values to be interpolated. The ellipse will start moving half a second after the sequence starts. It will reach its destination half a second before the end of the sequence. Assuming that the time channel is being specified in units of seconds, the following table results:
chans.ellanim
	0.5     0          0       0
	7.25  -51.78792  -75.7002 -6.72896
The interpolation is done much as it was in Section 2. The data from ``chans.ellanim'' is read into interpolation channels 8, 9, and 10 within tabinterp. The use of linear interpolation ensures that the ellipse will move at a constant rate to its destination.
% tabinterp << EOF > chans.all
file chans.vsize 0;
file chans.eyept 1 2 3;
file chans.orient 4 5 6 7;
file chans.ellanim 8 9 10;
times 0 8 3;
interp spline 0 1 2 3 4 5 6 7;
interp linear 8 9 10;
EOF
cmd: file chans.vsize 0
chan 0:  File 'chans.vsize', Column 1
cmd: file chans.eyept 1 2 3
chan 1:  File 'chans.eyept', Column 1
chan 2:  File 'chans.eyept', Column 2
chan 3:  File 'chans.eyept', Column 3
cmd: file chans.orient 4 5 6 7
chan 4:  File 'chans.orient', Column 1
chan 5:  File 'chans.orient', Column 2
chan 6:  File 'chans.orient', Column 3
chan 7:  File 'chans.orient', Column 4
cmd: file chans.ellanim 8 9 10
chan 8:  File 'chans.ellanim', Column 1
chan 9:  File 'chans.ellanim', Column 2
chan 10:  File 'chans.ellanim', Column 3
cmd: times 0 8 3
cmd: interp spline 0 1 2 3 4 5 6 7
cmd: interp linear 8 9 10
performing interpolations
writing output
%
An appropriate template such as the one below must be created for use with tabsub.
% cat ell.proto
viewsize @0;
eye_pt @1 @2 @3;
orientation @4 @5 @6 @7;
start @(line);
clean;
anim all.g/ellipse.r matrix rmul
	1 0 0 @8
	0 1 0 @9
	0 0 1 @10
	0 0 0 1;
end;

% tabsub ell.proto chans.all > ell.rtanim
Note the use of the ``clean'' command to rt at the beginning of each frame in the template. This is required after the ``start'' for each frame in rt animation scripts which use the ``anim'' command. This command tells rt (librt actually) to forget any accumulated animation matrices, thereby restoring the geometry to the form it has in the database.
We can preview the path that the ellipse will take by creating a plot file which can be used as an overlay in mged. (In version 4.2 of BRL-CAD and beyond the animation sequence can also be viewed using the mged ``preview'' command.)
% awk '{print $2+30.8102 " " $3+5.0479 " " $4+35.07628}' chans.ellanim | \
xyz-pl > ell.pl

% mged moss.g
BRL-CAD Release 4.2   Graphics Editor (MGED)
    Wed Nov 11 00:36:43 EST 1992, Compilation 770
    mike@wolf.brl.mil:/m/cad/.mged.5d

attach (nu|tek|tek4109|ps|plot|sgi|X)[nu]? sgi
ATTACHING sgi (SGI 4d)
Gary Moss's "World on a Platter" (units=mm)
mged> e all.g
408 vectors in 0.459896 sec
mged> overlay ell.pl
db_lookup:  could not find '_PLOT_OVER*'
mged>
The ``overlay'' command creates pseudo entries of the form
``_PLOT_OVERLAY_'' in the version of the database in memory.
These are used to store the vectors of the overlay. They
are never actually objects in the geometric database on disk.
The next time
the overlay command is given, the ``_PLOT_OVER*'' objects are removed and
re-created. As a result, the message:
db_lookup: could not find '_PLOT_OVER*is not a cause for concern.
Once again, a postage stamp animation can be created to view the positioning and motion of the camera and objects.
% rt -M -s200 -o ell.pix moss.g 'all.g' >& ell.log < ell.rtanim
% mv ell.pix ell.pix.0
% pixtile -s 200 -S1024 ell.pix | pix-fb -h
0 1 2 3 4 5 6 7 8 9 10 11 12 13 14 15 16 17 18 19 20 21 22 23 24
% fbanim -h -p 5 200 25 3


The pixtile program creates a mosaic of the smaller image on the framebuffer. The resultant framebuffer image is animated using the fbanim program.
